OVERVIEW
I am currently working on creating a drone from scratch using a C++ coded flight controller. I originally started this project in 2017, but it was never finished. I decided to restart it in 2020. With my improved coding skills, CAD design and knowledge, I think I have a better shot at completing it. Below is an explanation of the new project so far. Due to this being an ongoing project, the informaiton below may be out of date.
If you would like to see the original project click here.
If you would like to see the original project click here.
Recent updates:
- Update 12 - Migrating all my code to Mbed for programming.
- Update 11 - Decided that I need to switch to a microcontroller with an FPU (ARM Coretex M4F) so that the refresh rate can be increased. Currently floating point calculations make up ≈60% of processing time.
- Update 10 - Switching to a new gyroscope and magnetometer that both runs using SPI (so that i can increase refresh rate and try to eliminate jittering)
- Update 9 - Having issues with yaw axis. Struggling to tune the yaw-axis PID control so that it does not jitter.
- Update 8 - PID for roll and pitch is tuned better and much more stable (see videos below)
- Update 7 - Completed initial tuning of the PID control. I have observed a good response. It is not perfect and could do with more tuning but good enough for now.
- Update 6 - Tested the PID control. It works but needs to be tuned.
- Update 5 - PWM control of motors is now completed in parallel for all 4 motors. This required implementing a sorting alogrithm to order motor duty cycles.
- Update 4 - Created an new C++ class for the MPU6050 accelerometer and gyroscope
- Update 3 - Finished coding a C++ class for the RF24 Transciever and successfully tested communication between a remote and the drone.
- Update 2 - Started re-writing all code.
- Update 1 - 3D printed a ball and socket joint to create a safe indoor test rig for my drone.
PROTOTYPE
|
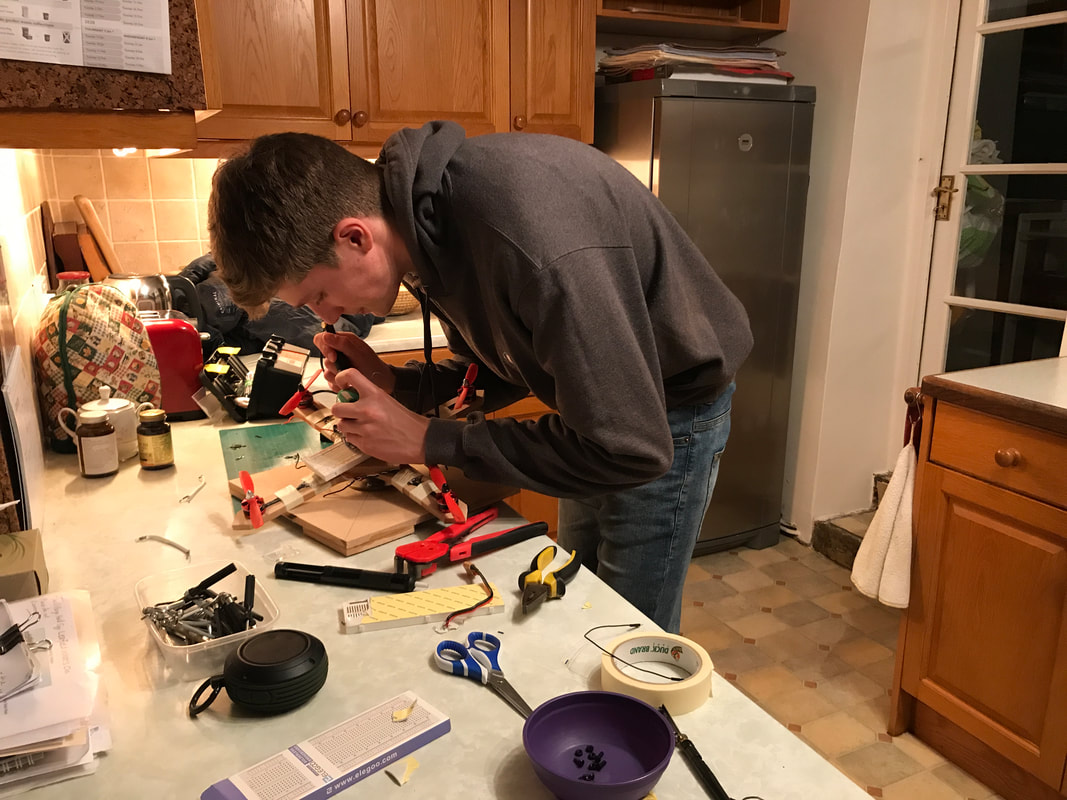
I designed a simple prototype test platform for my drone. It consists of a single piece of MDF cut into an 'X' shape with a motor on each tip and a breadboard with all electronic components on top. The battery is mounted underneath using duct tape.
The benefit of this prototype is that it allows me to easily work on the drone and access all parts. I am also able to add weights to balance the drone. On the right is a photo of me solding the ESCs to the power distibution board on this prototype. |
|
PID TUNING
|
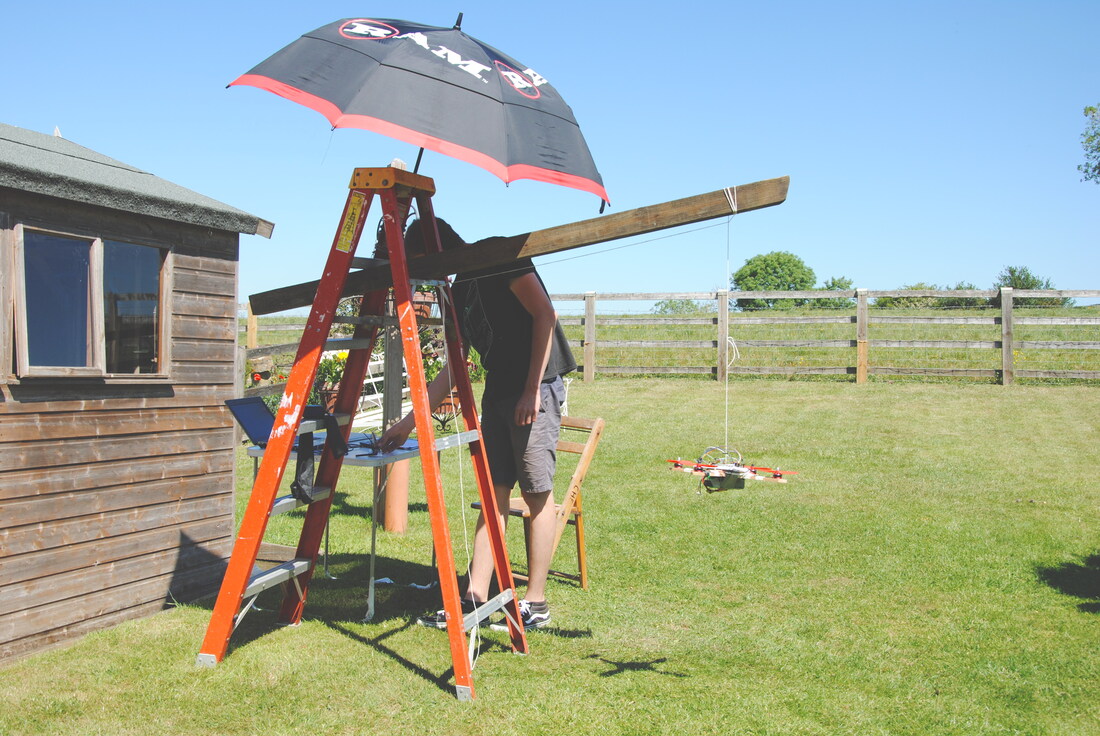
I tuned the PID algorithm by hanging the prototype from a string outside. I chose to do this on calm days with little wind. My setup also included 2 laptops, one allowing me to control the values for P,I and D using the remote (this negated the need for me to reflash the Arduino on the drone every time I changed the value) and the other allowing me to plot the results of my tests with excel.
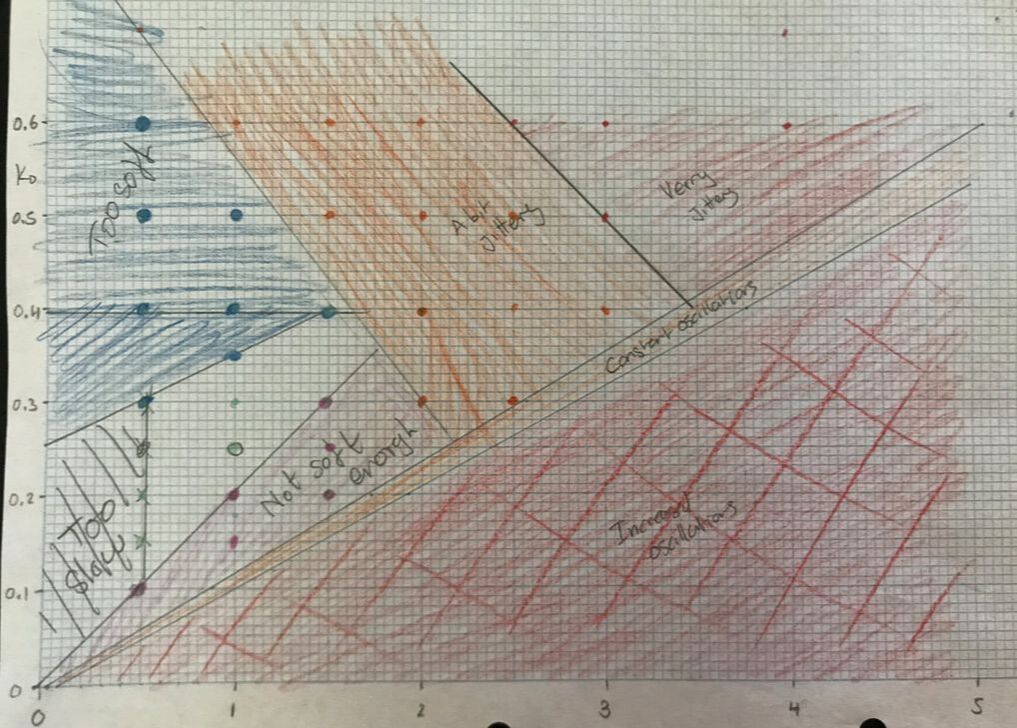
My testing method was to start with small values of P and D (with I = 0) and increase them individually and measure the response of the drone to being nudged. I classified each response into the following categories:
From this, I was able to see a trend and plot a graph. This graph allowed me exclude a large number of values which the graph showed would not decrease the oscillation and so were unstable. I then increased P and D until the drone started to jitter with a high oscillation frequency. This is a result of noise in the sensor values being amplified by the PID algorithm this allowed me to exculde another area of the graph (and thus other values for P and D). I then measured the damping effect from the D constant and this allowed me to exclude other values because either D was too high and dampened too much or too low causing small sways after being nudged. Finally, I could exclude values of P that were too low and caused a slow response. This left me with a small number of values that produce a good response. See the graph on the right. |
|
PID RESPONSE DEMO
Below you can see the effect that the PID control algorithm has on the drone. It immedietly returns the drone to a level position.
|
Natural oscillation on string
|
With PID Algorithm (real time)
|
With PID Algorithm (slow motion)
|
CODE
The code is written in C++. I am using Arduino Nano microcontrollers for both the drone and the remote.
A current version of my code can be downloaded here:
A current version of my code can be downloaded here:
| drone_code.zip |
